Replacing a door is a project within the capabilities of most do-it-yourselfers. Throughout the installation, take care not to damage or disturb the door frame and trim.

These instructions are general; always follow the manufacturer's directions for the specific product you are using. Your retailer will help you plan the project and advise you on what products are available to help.

In this document you will find information about:

  • Entry Doors
  • The Lockset
  • Combination Storm/Screen Doors
  • Interior Doors


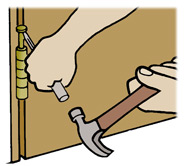
FIG. 1 - Use an old screwdriver or chisel to tap out the hinge pin.


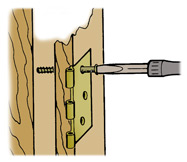
FIG. 2 - Attach the hinge leaves with screws that are long enough to reach well into the wall framing.


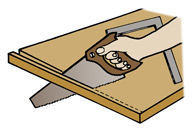
FIG. 3 - Trim the bottom of the new door with a fine-toothed saw to fit the opening.


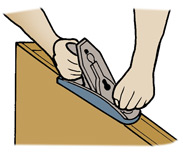
FIG. 4 - Use a jack plane to trim the door edges as needed.


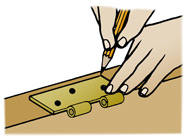
FIG. 5 - Use the hinge leaf as a template to mark the mortise locations on the door edge.


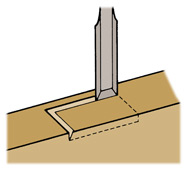
FIG. 6 - Use a sharp wood chisel to score the marked mortise edges.


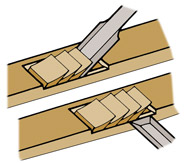
FIG. 7 - Make a series of cuts inside the scored line, then clear away the wood chips with the chisel.

ENTRY DOORS

  • Entry doors can become damaged or unsightly because of exposure to outside elements. The entry can also be changed for the focal point of an exterior facelift.

  • To remove the original door, open it and place a wedge under the outer corner, taking the weight off the hinges.

  • Most doors are hung on loose-pin hinges–half of the hinge is attached to the door and the other half to the door frame, with the two halves held together by a pin. To remove the pin, tap it up, then pull it out completely (Fig. 1). Start at the bottom hinge and repeat this procedure at the center and top hinges. Now you can remove the door from its frame.

  • In some vintage homes, the hinges may not be the loose-pin type. Or the hinge pin may be "frozen" in place, perhaps by several coats of paint. In such cases, remove the door by unscrewing the hinges (bottom hinge first, then middle, then top) from the door frame.

  • Unless the old door is badly warped or damaged, set it aside to use as a pattern for trimming the new one.

  • Next, remove the hinge leaves from the door and the frame. You will probably want to install new hinges along with the new door. If so, make sure the new hinges are the same size as the old ones. If the original hinges are in good condition, you can brighten them with fine sandpaper, then spray them with a clear protective coating. This will give the hinges a "like-new" appearance.

  • Reinstall the hinge leaves on the door frame, using screws that are long enough to go through the frame and grip well into the stud-wall framing as a security measure (Fig. 2).

  • If the original door is usable as a pattern, place it on the new door, carefully aligning the top and side edges. The new door may need to be cut down slightly; mark the difference along the bottom of the old door. If the old door is not suitable for this purpose, measure the door opening, allowing a 1/8" clearance at the bottom (3/4" or more if the door opens over carpeting) and 1/16" at the top and sides. Transfer these dimensions to the new door.

  • Trim the bottom of the door, using a fine-toothed saw (Fig. 3). Use a block plane to dress the bottom edge, if necessary, working from the corners toward the center.

  • Use a jack plane to trim the edges as needed (Fig. 4). Bevel the latch edge of the door slightly inward–this helps to prevent binding when the door is opened.

  • Mark the location of the hinge mortises on the edge of the door, using the old door as a pattern. (Mortises are the carved or routed-out depressions that accept the hinge blades, leaving them flush with the surface.) If you're not using the old door as a pattern, place the new door in the opening, wedging it 1/8" from the bottom and mark the hinge locations on the door.

  • Now set the door on its latch edge. With a try square or combination square and a sharp pencil or knife, mark a line across the door edge at each hinge location, then use the hinge leaf as a template to outline the hinge on the door (Fig. 5). This indicates the location of the hinge mortises.

  • With a sharp wood chisel, score around the marked edges for the mortises (Fig. 6). Be careful that you don't cut more deeply than the thickness of the hinge leaf.

  • Hold the chisel at an angle with its beveled edge down and make several cuts inside the scored area to the proper depth for the mortise (top, Fig. 7).

  • Clean out the mortise by cutting away the wood chips with the chisel (bottom, Fig. 7). Place the hinge leaf in the mortise to check the fit, but do not fasten the hinge yet.

  • Nearly all interior and exterior doors are taller than 6'. They require three hinges to properly distribute the weight. The middle hinge should be halfway between the top and bottom hinges.

  • Coat all edges of the door with wood sealant to shut out moisture.

  • Attach the hinge leaves to the door with wood screws.

  • Place the door in the frame and insert the top pin, then the bottom pin. Check the fit. If it's satisfactory, close the door and mark the location of the middle hinge on the door frame.

  • Remove the door (bottom hinge pin first, then top).

  • If there were three hinges on the original door, your middle hinge should use the same door frame mortise as the old hinge. If there were only two hinges, use the hinge leaf as a template and outline the location of the intermediate hinge on the door frame. Cut the mortise on the frame as described previously for door mortises. Attach the intermediate hinge leaf to the door frame.

  • Set the door in place and insert the hinge pins, working top to bottom.


FIG. 8 - Peephole hardware fits through a hole bored in the door.

THE LOCKSET

  • Your new door deserves a new lockset. Your local retailer carries a wide variety of attractive styles. Any type you purchase will come with detailed manufacturer's directions for installation and paper templates to guide you in boring the necessary holes in the door and the door edge. The door edge is mortised–follow the procedures already described.

  • Try to align the new lock with the existing strike plate in the door frame. If the latch bolt of the new lock does not fit into the strike plate, align the unit so that the new strike plate can be installed in the existing mortise in the door frame. You can enlarge the mortise to accommodate the new plate, if needed. If the existing mortise is too large, install the new strike plate and fill in any extra space with wood putty.

  • For added security, you should seriously consider putting in a deadbolt. Install it following the manufacturer's directions for the model you purchase.

  • Another security precaution is a peephole. This allows you to see who is calling before opening the door. The peephole should be installed at the eye level of the shortest person who will be using it (obviously not a small child). Cut a hole using a hole saw chucked into an electric drill. The hardware is then passed through the hole and secured by a flanged ring nut (Fig. 8).


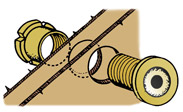
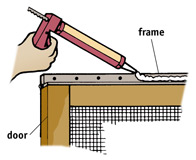
FIG. 9 - Apply a bead of non-hardening caulking compound behind the combination door frame.


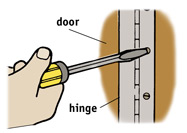
FIG. 10 - Use wood screws to attach the metal door frame to the opening.


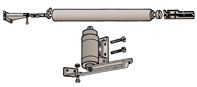
FIG. 11 - The door closer uses either a hydraulic (top) or pneumatic (bottom) system.


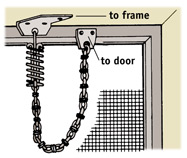
FIG. 12 - Install the retaining chain as illustrated.

COMBINATION STORM/SCREEN DOORS

  • A properly fitting storm door can be a real energy saver and a major contribution to indoor comfort during the winter months. Its summertime counterpart, the screen, is essential for allowing cooling breezes to enter while blocking out pesky insects. But because of the screen door's light construction and the beating it takes from children, pets, and the weather, occasional replacement is required.

  • It's easy to replace an old wood combination door with a new wood unit–simply adapt the techniques detailed previously for entry doors. But make sure that the storm/screen door latch doesn't interfere with the lock and knob on the entry door. Add the accessory hardware, and the job is complete.

  • Aluminum combination units are far more common than wood. These may be doors with hinges or pre-hung units in their own frames. The mounting methods differ. The manufacturer of the door you purchase provides detailed instructions for your specific unit. It is critically important that you follow the instructions precisely, rather than first starting the job and then reading the step-by-step instructions.

  • The "hinges-only" type may mount directly into the hinge mortises of the old door. If not, you can make new mortises in the door frame. The old mortises can be filled with thin wood "patches" glued into the recesses. Wood putty, sanding, and painting will hide the repairs.

  • A common pre-hung metal combination door comes with the door clipped to the frame to keep the unit together and in square. Leave these clips in place until the installation is complete.

  • Remove the old door. Fill any hinge or striker plate mortises in the frame, as described earlier. Try the new door and frame in the opening. If it is too high, trim the bottom with a hacksaw. If the opening is slightly out of square or heavily coated with paint, use a chisel to make minor adjustments.

  • When the fit is satisfactory, drill pilot holes through the metal frame into the wood opening frame. Apply a bead of non-hardening caulking compound to the back of the metal frame (Fig. 9). Then, press the metal frame into the opening and screw the unit in place (Fig. 10). Now you can remove the holding clips.

  • Most pre-hung units include a vinyl or rubber "sweep" at the bottom to keep out drafts. Adjust this so that it touches the door sill.

  • Install the door closer (Fig. 11) and the retaining chain (Fig. 12).

INTERIOR DOORS

  • Techniques for replacing most interior doors are the same as for entry doors. The locks are usually much simpler, with a pushbutton beside or in the knob. There may be no locking mechanism at all, just knobs and a latch bolt to hold the door closed.

TOOL AND MATERIAL CHECKLIST

Replacement Door Butt Hinges
Wood Screws (2" to 2-1/2") Screwdriver
Hammer Wood Chisel
Knife Try or Combination Square
Fine-Toothed Saw Block Plane
Jack Plane Tape Measure
Hole Saw Electric Drill
Drill Bits to Suit Lockset Hand Brace
Carpenter's Level Butt Gauge
Sandpaper Long-Nose Pliers
Clear Spray Coating Glue
Wood Putty Wood Sealer
Non-hardening Caulking Compound Caulking Gun
Lockset Deadbolt
Peephole Door Closer
Accessory Hardware  
Check your state and local codes before starting any project. Follow all safety precautions. Information in this document has been furnished by the National Retail Hardware Association (NRHA) and associated contributors. Every effort has been made to ensure accuracy and safety. Neither NRHA, any contributor nor the retailer can be held responsible for damages or injuries resulting from the use of the information in this document.