Here are tips and suggestions on how to build wood fences. These tips can save you time, money and effort. Read all suggestions carefully before beginning the job.


SPACING THE FENCE POSTS
  • As a rule, you should set fence posts about 6' to 8' apart. The spacing of the posts depends on the type of fence you build, the terrain, the purpose of the fence, and other such factors.
  • Set the corner or end post first. Then stretch a line from each corner or end post to align all the posts in between.
  • Drive a stake every 6' to 8' at the exact position where the post hole is to be dug (Fig. 1).
  • Take time to measure and position the posts accurately. The appearance and the structural strength of your fence depends a great deal on the positioning of the fence posts.


SETTING THE FENCE POSTS
  • Set all wood fence posts with about 1/3 of their total length buried in the ground. This is especially important on corner posts and any posts that will carry heavy weight or withstand high wind pressure.
  • Use a regular post hole digger to dig the post holes. Dig the holes straight to the proper depth at each stake marker.
  • You can anchor the posts more firmly by making the holes slightly larger at the bottom than at the top (Fig. 2). Place a large stone or two shovels full of gravel in the bottom of each hole. This provides drainage to avoid excessive moisture at the base of each post.
  • Use a wood preservative to treat the section of the post that will be underground. Allow the post to stand overnight in the preservative so it can become well-saturated.
  • You can pack the posts with either dirt or concrete. In either case, place two or three shovels full of gravel in the bottom of each hole before the post is placed into position.
  • Be sure the posts are in an exact, upright position (Fig. 3). You can check the alignment of each post with a regular level. You can also check the alignment of the posts in one direction by sighting from one end of the row of posts to the other.
  • Brace each post with stakes after it is properly aligned (Fig. 3). Keep the stakes in position until the concrete (if used) has thoroughly set. Remove the nails holding the braces and readjust the post until it is in accurate alignment.
  • When the post is properly aligned, tamp it thoroughly to pack the dirt (if used) around the base of the post. Be sure you do not alter the alignment of the post during the tamping process.
  • When the post is firmly in position, build a mound around it to help eliminate water standing at the post base (Fig. 4). Slope the concrete slightly away from the post and round it off with a trowel. Tamp the concrete lightly to eliminate any air bubbles left in the mixture that can act as water pockets.
  • Provide extra bracing at all corners (Fig. 5). A corner post must carry the weight of fence stretched in two directions, so it should be set in both directions.
  • Allow the posts to stand several days and settle firmly in position before adding the fence.
  • The heads of posts should be rounded, capped or slanted to help eliminate accumulating water, which can cause rotting. This is well-worth the effort since it allows the posts to last.


ADDING RAILS TO FENCE POSTS
  • Attach a top and bottom rail to the fence posts (Fig. 7). There are three basic ways to do this.
  • The center illustration shows the top rail being nailed to the top of the post. This is an ideal installation for many types of fencing structures. The top rail can always be joined to another rail in the center of a post this way.
  • If the rail is added on the body of the post rather than at the top, attach it with a groove, a wood block or a metal bracket.
  • You can attach the bottom rail to the post by either of the two outside illustrations.
  • Fig. 8 illustrates several other ways to attach a rail to a fence post. Study these illustrations carefully. The type of joint you use to attach the fence supports to the post depends primarily on the type of fence you are building.
  • The lap joint is one of the easiest to use. The grooved joint does basically the same job, but the rail is grooved into the post rather than being nailed to the post surface.
  • The butt joint is a little more difficult to make but is often better. The mortised joint is even neater than the butt joint, but you must cut a mortise into the post for this joint.
  • The slotted joint is commonly used on decorative fences. Treat all slotted joints with preservative to prevent rotting in the grooved areas.
  • Take time to measure from the top rail to be sure the bottom rail on each is in perfect alignment (Fig. 9). After you have measured one post, cut a measuring stick to prevent having to make an actual measurement on each post. The stick can be used to apply the same measurement to each post.


SELECTING THE FENCE STYLE
  • There are literally hundreds of variations in fence styles and construction materials. There is pre-assembled wood fencing sections as well as fencing materials made from recycled milk jugs. The type of fence you use depends primarily on the purpose.
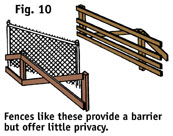
  • Fences like the type shown in Fig. 10 are used primarily for barriers. They are easy to build and provide an adequate barrier. However, they are usually not very decorative and they provide very little, if any, privacy.
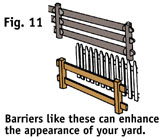
  • Fences like those illustrated in Fig. 11 provide barriers and are more attractive than an ordinary fence. With a little shrubbery or plants, such fences can provide very attractive barriers along property lines.
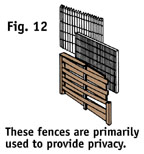
  • Fences such as those illustrated in Fig. 12 are primarily privacy screens. They can be built as tall as needed out of many different materials. Their primary purpose is privacy.
  • Consider your needs when selecting the style of your fence. If you want a simple barrier, a wire fence or a simple style fence such as illustrated in Fig. 10, will work fine.
  • For a barrier that enhances the appearance, consider styles similar to those illustrated in Fig. 11.
  • For added privacy, consider the styles illustrated in Fig. 12.
  • Regardless of the type of fence you plan to build, be sure you know exactly where your property line is located. If you are uncertain about the location of the line, check into it or work out an agreement on the fence location with your neighbor.
  • Also, check any local ordinances applying to fences before beginning construction. Call the building department of your local city hall or ask for the local government office that regulates construction to be sure you abide by city codes.
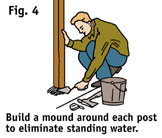
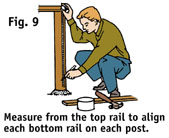
  • Try to keep the bottom rail of any fence at least 2" above the ground. This helps eliminate the problem of decay and makes it easier to trim grass around the base of the fence.
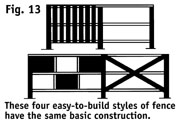
  • Fig. 13 illustrates four basic styles of easy-to-build fence. Each style has the same basic top, center and bottom rail construction. However, the fences look entirely different with the various rail treatments.
  • Study the designs in Fig. 13 carefully. Decide which of these styles you prefer, or use a little imagination and create your own fencing design to apply to the basic rail fencing structure.
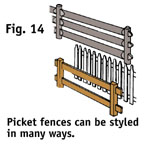
  • Picket fences are very popular and easy to build. With a little ingenuity you can create attractive picket designs. Study the designs in Fig. 14. Use the designs shown in Fig. 14 or your own designs to create a distinctive picket fence.
  • Make sure that all the pickets are spaced by inserting a loose picket between the picket previously nailed into position and the picket to be nailed. Use this easy method throughout the entire fencing construction.
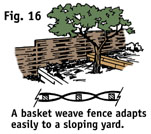
  • A basket weave fence is often used on a sloping terrain (Fig. 16). This style of fence allows you to raise or lower each post.
  • Use a good-quality board to build a basket weave fence. Boards full of knots may break easily when placed under the stress of basket weaving.
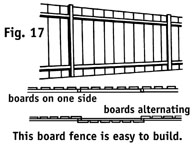
  • A simple board fence is easy to build and can be quite attractive (Fig. 17). You can place the boards on one side or alternate them from side to side.
  • The board fence provides both a barrier and privacy. It can be built as tall as needed and then stained, painted or left natural.
  • You can design a siding fence to match the siding on your home of this style. In fact, you can use the same siding that was used on the home to build the fence.
  • The siding fence can be covered on one side or both. Then, you can paint it to match or harmonize with the paint on your home.
  • These are only a few of the many styles of fencing available. Fences are easy to build, and the materials are readily available.

TOOL AND MATERIAL CHECKLIST

Boards & Posts Power Saw Post Hole Digger Paint or Outdoor Stain Steel Tape Marking Pencil
Small Axe or Hatchet Gravel or Sand Nails Hand Saw Hammer Work Gloves
Level Ready-Mix Concrete Wood Chisel Tamping Rod Wood Preservative

Check your state and local codes before starting any project. Follow all safety precautions. Information in this brochure has been furnished by the National Retail Hardware Association. Every effort has been made to ensure accuracy and safety. Neither the NRHA nor the retailer can be held responsible for damages or injuries from the use of the information in this document.