
Building A Deck
Once you have determined the basic design of your deck, the next step is to choose your materials. The following tables will help you determine how much material you need based on the lumber type you choose. All design recommendation below are suggestions only, for estimating purposes. Always check local building codes before determining the final design.

![]()
Tool & Material Checklist
Plumb Bob
Mason’s Line
2×2″s and 1×4″s for Batter Boards
Lag Screws, Hex, Bolts w/ Nuts & Washers
Wheelbarrow
Concrete Piers
Structural Connectors
Measuring Tape
Screws
Railing Material
Ready-mixed Concrete, Gravel
Adjustable Wrench
Chalk Line
Deck Boards
Hammer
8d and 16d Galvanized Common/Box Nails
Framing Square
Lumber for Posts, Ledger, Beams and Joists
6 mil Black Polyethylene
Shovel
Brushes
![]()

Choosing Materials
If you choose pressure-treated lumber, you’ll have a choice between 5/4 x 6 decking or 2″ material (typically 2×4 through 2×8). The size and species of the decking you choose will determine the spacing between your joists. Recommended spacing for common decking boards is as follows:

![]()
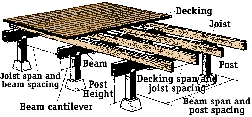
Determining Joist Size
2x6s through 2x10s are the most common sizes used for joists. The beams that carry them are typically 4×6 through 4×10. Pressure treated lumber is generally less expensive then redwood or cedar, and can be used for the substructure even when the decking and railing will be other species.
In most cases, you’ll want to determine the spacing between beams first, then use joist size appropriate to that spacing. If the deck will be no more than 6 feet off the ground, a common recommendation is to space the support beams no more than 12 feet apart. As a rule, you’ll only need one beam along the outer edge of the deck (a ledger bolted to the house supports the other end of the deck).

![]()

![]()
Determining Beam Size
Since support posts are often run through the decking to serve as railing posts, the specifications below are given for posts that will be no more than 12 feet apart. With these spacing specifications, 4×4 posts are adequate for any deck less than 6 feet off the ground.

![]()

Preparation & Layout
Preparation
First, prepare the ground under the deck by removing sod. Slope the ground away from the house a minimum of 1 inch every 15 feet to provide drainage. Once the deck is finished, the ground should be covered with 6 mil black polyethylene to keep weeds from growing.
Measure and mark the position of the ledger along the wall. The height of the ledger should be 1 inch below the bottom of the door plus the thickness of the decking, plus the depth of the joists. It makes no difference which way you set the joists, as long as your layout is consistent.

Mount 2×6 ledger to the wall with 1/2 inch lag screws. The ledger must be level, the lag screws should be long enough to penetrate the studs at least 3 inches. Use two lag screws at each end and one at each wall stud in between. Install a “Z” shaped lashing above the ledger to shed water or space the ledger away from the wall with washers.
Layout
To establish the outside perimeter of the deck, measure out from each end of the ledger about 19 inches beyond the outside edge of the deck. Set up the batterboards, then run taut strings from each end of the ledger to the batterboard to establish the sides of the deck.
Run a third string between the batterboards to establish the outside edge of the deck. Square the layout by measuring the opposite diagonals, the adjusting the ledger-to-batterboard strings until both measurements are equal.
![]()

Building the Structure
Footing and Piers
Use a plumb bob from the string to establish the location of the footings. The holes for the footing must be deeper than the maximum frost penetration in your area and deep enough to rest on undisturbed soil. It’s a good idea to dig 6 inches deeper to fill the bottom of the hole with gravel to allow drainage.
Mix concrete and pour the footings. As you finish each pour, set a precast pier on the footing so it extends about 6 inches above ground level. Use a thin cement mix to bond the piers to the footings.
Posts
After the concrete has set, stand the posts on the piers. Use temporary braces and level to plumb the posts. Once the posts are set, run a mason’s line from the top of the ledger to each post and use a line level to mark it for cutting. The height of the post should be equal to the height of the ledger minus the depth of the beam that will be set on it.

Beams
Fasten post-to-beam connectors on top of the posts with nails and 1/2 inch x 5.5 inch hex bolts, then set the beams into the connector. Plumb and square the assembly, then sense the beams as you did the posts.

Joists
Mark the joist location on both the beams and ledger, with 16 inch or 24 inch o.c., as per your design. Set the joists in place with crowns up. If deck is wide enough that you need two sets of joists, splice the connection by overlapping each pair of joists at least 1 inch and nailing them together with 8d galvanized nails. Install blocking between the joists wherever required. Blocking requirements are determined by your local codes. Finally nail the rim joist across the ends of the joists.

![]()

Decking & Railing
Decking
Deck boards should be laid with the bark side up, with both ends centered over a joist. Stagger the joists of side-by-side deck boards, so the don’t line up. Notch the board around posts or other obstructions, leaving 1/8 inch space for drainage.
2 inch thick deck boards should be spaced approximately 1/8 inch; most builder set a 16d nail between the boards as they fasten them. 5/4 x 6 pressure-treated decking may be placed with each board flush against the next; natural shrinkage will provide the proper spacing.

Fasten the deck boards at each joist. Use two fasteners per support point for decking up to 6 inches wide or three fasteners for wider boards. Deck screws or clips are generally better than nails, but all fasteners must be dipped galvanized or stainless steel. If you use nails, blunt the point to avoid splitting the decking. Let the decking run over the edge of the structure, then saw the ends off after all board are laid.
Railing
Secure the railing posts at each corner of the deck and on each side of the stairs. Then secure the field posts, spaced equally between the corners but no further apart than allowed by local building codes. Nail the sub-railing and cap rail in place, then add the balusters.
![]()