Here are tips and instructions on working with concrete. Take the time to read these directions thoroughly; following them can save you time and effort. It can also help you end up with a neater, more satisfactory installation–with far less waste.

In this document you will find information about:

  • Determining the Type of Concrete to Use
  • Mixing Your Own Concrete
  • Estimating the Materials Needed
  • Building the Forms for Pouring Concrete
  • Pouring Concrete
  • Reinforcing Concrete
  • Different Ways to Finish Concrete
  • Letting the Concrete Cure

DETERMINING THE TYPE OF CONCRETE TO USE

  • You can use many different types of concrete. Ready-mix concrete, which requires only the addition of water, is the simplest to use. It is ideal for small jobs but can be quite expensive for big projects.

  • Transit-mix concrete is delivered to the job site in revolving barrel trucks. This is the simplest and easiest way to buy concrete for large projects. However, you'll be paying for the delivery of the concrete and the convenience of premixing. Check local sources for competitive prices on transit-mix concrete.

  • You-Haul concrete is available in some areas. You buy the concrete and rent a You-Haul trailer mixer for transporting the concrete to the work site with your car or truck. Again, you have to pay for the premixing and the trailer rental. Check locally for prices on You-Haul concrete.

  • The least expensive way to purchase concrete for large projects is to buy the dry ingredients and mix them yourself at the job site. Of course, this requires a lot of work, and you must either rent or purchase the necessary mixers and other equipment.

  • The type of concrete you use will be based on the amount of concrete you need and local prices for the various types.


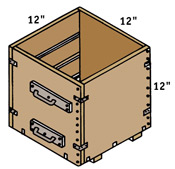
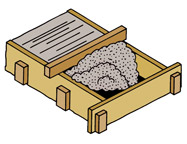
FIG. 1 - Measure a cubic foot of sand or concrete with a wooden box measuring 12" x 12" x 12".

MIXING YOUR OWN CONCRETE

  • There are four basic elements in concrete: Portland cement; a fine aggregate, such as sand; a coarse aggregate, such as crushed rock or gravel; and water.

  • The aggregates (sand and gravel) usually make up from 2/3 to 3/4 of the volume of any finished concrete. All aggregates should be clean and free of organic matter.

  • The water used for mixing concrete should be clean and free of acids, alkalies, oils and sulfates.

  • Although the ingredients in concrete are always the same, the finished results depend on the proper mix of the four elements.

  • The proper mix of ingredients is determined by the intended use of the concrete.

  • For foundations and retaining walls, use about 6-1/4 gallons of water for each sack of cement if the sand is damp. However, if the sand is wet, 5-1/2 gallons of water will easily do the job.

  • Concrete that's mixed for pouring sidewalks, stepping stones, slabs, etc., requires about 5-3/4 gallons of water per sack of cement if the sand is damp and about 5 gallons if the sand is wet.

  • If you are pouring heavy footings for walls where waterproofing is not a factor, mix the concrete with 1 part cement, 3 parts sand and 4 parts gravel.

  • For sidewalks, steps, driveways, etc., use 1 part Portland cement, 2 parts sand and 3 parts gravel.

  • For small jobs, you can measure the ingredients using an ordinary galvanized or plastic pail.

  • A wooden box measuring 12" x 12" x 12" (Fig. 1) can give you an accurate measurement for 1 cubic foot of sand or concrete.

  • Nail 3/4" half-round to one side of the box at carefully measured points. This will allow you to measure 1/4, 1/2 and 3/4 of a cubic foot.

  • Always follow the mixing instructions on the bag when mixing your concrete.

ESTIMATING THE MATERIALS NEEDED

  • Fig. 2 provides a table showing the number of cubic yards of concrete required to pour slabs of varying sizes and thicknesses.

    FIG. 2
    Multiply the length of the area by the width to determine the area's square footage
    Area in square feet
    (length x width)
    Thickness in inches
      4 5 6 8 12
    50 0.62 0.77 0.93 1.2 1.9
    100 1.2 1.5 1.9 2.5 3.7
    200 2.5 3.1 3.7 4.9 7.4
    300 3.7 4.7 5.6 7.4 11.1
    400 4.9 6.2 7.4 9.8 14.8
    500 6.2 7.2 9.3 12.4 18.6

  • To use this table, multiply the length by the width of the area you plan to cover with concrete. This gives you the square footage of the area.

  • Now, refer to the number of square feet and the thickness in inches of the slab you plan to pour. The figure on the appropriate line shows the number of cubic yards of concrete you'll need to do the job.

  • For example, if you are planning to pour a patio that's 10' x 14', you have a total of 140 square feet.

  • Suppose you plan to pour the patio slab 5" thick. Consult the table–you'll find that 100 square feet of a slab this thick requires 1.5 cubic yards of concrete and an additional 50 square feet would require .77 cubic yards. Therefore, you would need 2.27 cubic yards of concrete to pour the slab.


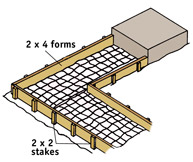
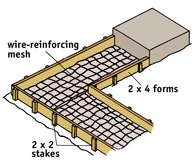
FIG. 3 - Build forms to the shape and size needed for your job.

BUILDING THE FORMS FOR POURING CONCRETE

  • Almost any concrete job requires some type of form. In some cases, forms are built above the ground while others require digging.

  • Dig down to the desired level (Fig. 3), and build forms to the shape and size needed for the concrete job you are starting.

  • Use temporary posts to establish the proper grade or slope of the concrete.

  • Nail the stakes lightly to the forms used (Fig. 3), or clamp the forms temporarily to the stakes with a "C" clamp.

  • Use a level to ensure that you have the proper grade or slope of the concrete form.

  • After the proper grade has been set, drive in permanent stakes and nail the form to the stakes.


FIG. 4 - Use a straightedged 2x4 to level the concrete.


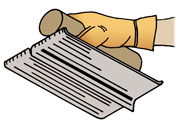
FIG. 5 - Use a 2x8 plank as a straightedge to guide a concrete groover.


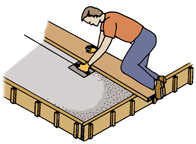
FIG. 6 - Draw the groover along the edge of a 2 x 8 to create contraction joints.


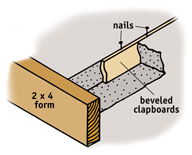
FIG. 7 - Create expansion joints on large concrete areas by using clapboard siding.

POURING CONCRETE

  • After the forms are set, spray the entire area lightly with a garden hose, then pour in the concrete.

  • After the form is filled, tamp the freshly poured concrete to compact it. Use a tamper, or put on rubber boots and walk around the poured concrete area to make sure it is compacted around the edges.

  • Small concrete areas can be compacted with a 2x4. For larger areas, you may want to rent roller tampers.

  • After the concrete in the form has been thoroughly tamped, use a straightedged 2x4 as a screed for leveling the concrete (Fig. 4).

  • Work the 2x4 back and forth in sawing fashion to level the concrete at all points across the form.

  • Purchase a magnesium concrete rake with an extension handle to level concrete in hard-to-reach places.

  • When the concrete has set sufficiently to support a 2x8 plank, use the plank as a straightedge to guide a groover (Fig. 5) to cut contraction joints (Fig. 6). Contraction joints are necessary to allow hardened concrete to expand and contract in extreme temperatures.

  • On sidewalks or other narrow concrete areas, contraction joints should be cut every 4' to 6'.

  • On patios or other large concrete areas, expansion joints should be cut in each direction every 4' to 6'. Use two lengths of beveled clapboard placed in the position shown in Fig. 7 to cut these joints.

  • Drive a nail into the top of one board and paint both boards with motor oil. The boards should then be embedded in the concrete, as shown in Fig. 7.

  • After the concrete begins to set, the board with the nail in the top can be removed, leaving the second board hidden. This provides an adequate contraction joint for a large expanse of concrete.


FIG. 8 - Wire-reinforcing mesh is used to strengthen some concrete.

REINFORCING CONCRETE

  • In some cases, concrete needs reinforcement with steel mesh (Fig. 8). You can use regular fencing material with 2' x 4' or 2' x 6' mesh.

  • If the pressure on the concrete is to come from the top of the slab, the reinforcement should be laid deep near the bottom of the slab.

  • If the strong point of the slab is at the center and the pressure will come on either end, the reinforcement should be laid as close to the top of the slab as possible.


FIG. 9 - Use a wooden float to smooth the concrete prior to finishing the surface.


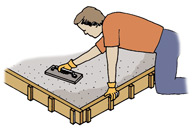
FIG. 10 - Use a steel finishing trowel to give the concrete a smooth, even surface.


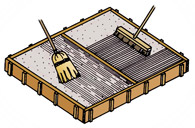
FIG. 11 - Different brooms will create different finishes on concrete surfaces.


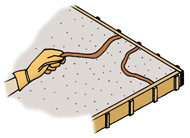
FIG. 12 - Use a 1/2" or 3/4" copper pipe that is slightly bent to create a flagstone pattern.

DIFFERENT WAYS TO FINISH CONCRETE

  • You can give concrete a smooth finish with a trowel and a float (Fig. 9). The float will smooth out the concrete on the first rubbing.

  • A trowel (Fig. 10) is used to give the concrete a finishing touch.

  • You can create a light, swirled pattern by holding a steel trowel flat against the surface of the slab and moving it around in a swirling motion. Do this the last time you trowel the concrete.

  • For a heavier swirling pattern, use a wood float instead of a trowel and do the swirling while the concrete is still fairly wet.

  • Create a soft pattern of parallel lines by dragging a soft brush straight across a moderately wet surface (Fig. 11).

  • To achieve heavy lines, drag the softbrush across while the surface is still wet.

  • For light-textured parallel lines, trowel the concrete and allow it to dry slightly before dragging the brush across (Fig. 11).

  • Use an ordinary broom to create a very attractive and practical pattern in concrete (Fig. 11). This technique provides a rough finish that makes the concrete surface much safer when wet.

  • You can make all brush strokes in the same direction, or each block between contraction joints can be brushed in opposite directions for a unique appearance.

  • Use an ordinary garage floor brush to create attractive wavy patterns in newly laid concrete. The wavy patterns enhance the appearance and make the surface safer when wet.

  • You can create a flagstone pattern by tooling the concrete after it has been leveled off with a darby or float. To make the flagstone pattern, use an 18" length of 1/2" or 3/4" copper pipe that is slightly bent (Fig. 12).

  • Trowel and brush the concrete surface lightly after the flagstone pattern has been created in the wet concrete.

  • There are also forms available for concrete that will create a flagstone walk. These work extremely well for smaller projects. For larger areas a relative new concrete stamping process creates the same look on driveways and patios. Contractors, due to the cost of the equipment needed, normally do this concrete stamping.

  • Whatever pattern you choose to create, remember, the pattern should not trap water and cause it to stand on the concrete. Standing water is one of the major causes for concrete failure.

  • Special colorants are available for concrete. When added to the concrete mix, these colorants can make concrete look like red brick or any number of other materials. Concrete can be colored to accent the color of your home.

LETTING THE CONCRETE CURE

  • All concrete must be given time to cure. During this period, the concrete surface should be kept wet by repeated hosing with a fine mist.

  • This hosing process should be done at least twice during any 24-hour period for about three days after the concrete is poured.

  • Concrete poured indoors can be left exposed. However, you should place a guard rail around the area to keep any child or animal from walking on the surface until it is dry.

  • Concrete laid in the open air or in direct sunlight should be covered with burlap, roofing felt or building paper during the curing period. Remove this protective covering before wetting the concrete.

  • Never attempt a big concrete job on an extremely hot day. Concrete sets extremely fast in direct sunshine. It's better to wait until mid-afternoon–even if this means you must work late into the evening.

  • You can improve the looks of the concrete and make it last longer by sealing the concrete after it has thoroughly cured. Sealers can either be clear or colored. Some coatings have an additive that provides better traction on the concrete surface. Be careful when choosing the coatings and sealers. Some are extremely slippery when wet and should not be used outside.

TOOL AND MATERIAL CHECKLIST
Concrete Mix Garden Hose
Level Darby or Float
Hatchet Tiling Spade
Groover Long 2x4s for Screed
Line Brush or Broom
Concrete Hoe Plastic or Galvanized Pail
2x4s and Other Material for Forms Edger
Rubber Boots Line Level
Reinforcing Mesh Trowel

Check your state and local codes before starting any project. Follow all safety precautions. Information in this document has been furnished by the National Retail Hardware Association (NRHA) and associated contributors. Every effort has been made to ensure accuracy and safety. Neither NRHA, any contributor nor the retailer can be held responsible for damages or injuries resulting from the use of the information in this document.