Here are miscellaneous how-to tips and suggestions that you will find useful around the house. These are merely a few of the many handyman tips given in our Show-How Sheet series.

|

SANDING TIPS
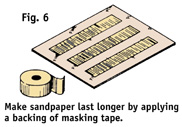
- You can make regular sheets of sandpaper or emery paper last longer and work better by backing them with masking tape (Fig. 6).
- The tape gives each sandpaper sheet more body, and helps to keep it from tearing or creasing while you are working. A few pieces of masking tape on the back of a regular sheet of sandpaper will add two to three times the life of the paper.
- Use regular sandpaper to smooth the sharp edges of cut glass, ceramic tile, porcelain, etc.
- Wrap a piece of fine sandpaper around a scrap piece of wood. A short piece of 1 x 2 lumber makes an ideal block for sanding these types of cut materials.
- Rub the sandpaper sheet along the edge of the glass evenly and smoothly.
- As the cutting edge of the sandpaper is worn away, rotate the sheet of paper on the block to provide a new surface until the sheet is used up.
- Sanding irregular and uneven surfaces can sometimes be a problem. Corners and grooves can be extremely difficult to reach with a flat piece of sandpaper.
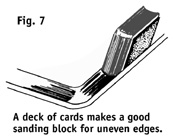
- For sanding irregular edges of table tops, chair legs, etc., use a deck of cards as the sanding block (Fig. 7).
- The cards and sandpaper will adjust to the contour of the surface you are sanding. This makes a sanding block that is quite flexible, yet provides a firm base for holding the sandpaper against a curved surface.
- Use old record covers to hold various grades of sand-paper (Fig. 8). They keep the sandpaper clean and orderly.
- Old record covers also enable you to determine the grit of the paper quickly and easily, since the texture and grit show through the holes.
|

|

SAWING TIPS
- It's important to select the correct blade for your hacksaw. Select a hacksaw blade that always keeps at least three teeth on the surface you are sawing (Fig. 9).
- While a coarse blade cuts faster and lasts longer, you'll get better results when at least three teeth are touching the surface at all times.
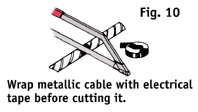
- You can avoid ragged edges when cutting armored cable by wrapping the cable with regular electrical tape before you begin sawing (Fig. 10).
- Remove the tape and you will find a smooth, clean edge that slides easily into other fittings without filing.
- You can avoid jagged edges on sawed conduit by driving a short length of dowel into the conduit before you cut it.
- You can also use a short length of dowel as a support when cutting any hollow metal tubing with a hacksaw. The dowel is especially helpful when making slanted or irregular cuts in hollow tubing.
|
|

MEASURING TIPS
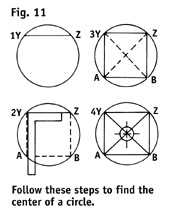
- Finding the center of a circle is sometimes essential for various jobs around the house. Follow these steps to make it easy.
- Draw a straight line across the circle at the top from Y to Z (Fig. 11). Draw this at any point in the upper section of the circle.
- Now use a square to draw a rectangle within the circle. Use the Y and Z line to create the rectangle.
- When the rectangle is drawn within the circle, draw lines diagonally from one corner of the rectangle to another. The exact center of the circle is always at the point where these two diagonal lines cross.
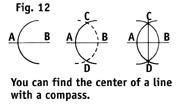
- You may also want to find the exact center of a line the easiest and fastest way.
- One simple way is to use a compass to draw an arc at any point between the two ends of the line (Fig. 12).
- Set the end of the compass at one end of the line and draw an arc at any point beyond the halfway point.
- Move the compass to the opposite end of the line and draw an arc from that point with the compass at exactly the same setting.
- Now draw a straight line from the points where the two arcs cross at the top to the point where the arcs cross at the bottom. The center of the line is at the exact point where this line crosses the line you are measuring.
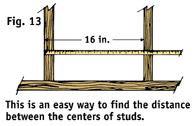
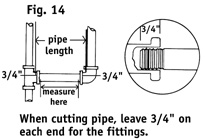
- One of the easiest ways to find the exact distance between the centers of studs is to measure from the outside edge of one stud to the inside edge of the adjoining stud (Fig. 13).Fig. 14 shows how to measure pipe when cutting replacement pieces for repair jobs.
- Always allow enough additional pipe to be screwed into the pipe fitting. In other words, measure the distance from fitting to fitting, then allow for about 3/4" on each end to be inserted into the pipe fittings.
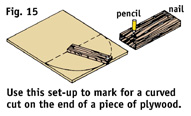
- Fig. 15 shows how you can use a simple piece of scrap material and two nails to mark for a curved cut on the end of a piece of plywood.
- Drive one nail loosely into the board at the exact center. Use a nail as a marker on the other end of the board. Or you can drill a hole in the end of the board and use a stub piece of pencil instead of a nail.
- A chalk line is usually the fastest and most efficient way to draw a long, straight line.
- Stretch the chalk line between the two points, and snap it firmly against the work surface. The chalk line will mark the exact location on the surface easily, quickly, and accurately.
|
TOOL AND MATERIAL CHECKLIST
| Star Drill |
Propane Torch |
Solder |
Hammer |
Chalk Line |
| Steel Square |
Hacksaw |
Paintbrush |
Steel Wool |
Soldering Iron |
| Hot Pads |
Nails |
Steel Tape |
Friction Tape |
Sandpaper |
| Paint Roller |
Paint Stirrer |
Paper Plates |
Magnet |
|
Check your state and local codes before starting any project. Follow all safety precautions. Information in this brochure has been furnished by the National Retail Hardware Association. Every effort has been made to ensure accuracy and safety. Neither the NRHA nor the retailer can be held responsible for damages or injuries from the use of the information in this document.