|
|
 |
|
 |
|
|
|
|
|

GENERAL CONSIDERATIONS
|
 MOUNTING THE
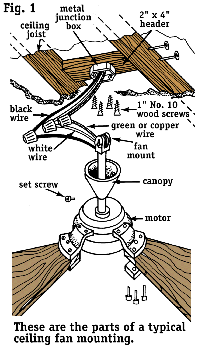
CEILING FAN MOUNTING THE
CEILING FAN
|

|
 ASSEMBLY ASSEMBLY
|
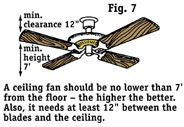 |
 HEIGHT BENEATH
BLADES HEIGHT BENEATH
BLADES
|
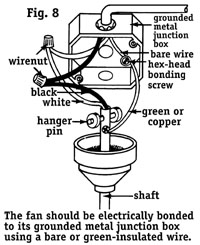 |
 MOUNTING THE FAN TO THE BOX
|
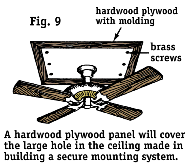 |
 PROBLEM HANGING PROBLEM HANGING
|
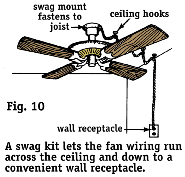 |
 SWAG KIT USE SWAG KIT USE
|
TOOL AND MATERIAL CHECKLIST  ELECTRICAL SAFETY
Ceiling Fan
Mounting Kit
Swag Kit
Lock Washers
Low-Ceiling Mount
Angled-Ceiling Mount
Patented Support Unit
4" x 1 1/2" Octagon Electrical Box
Cable, Switch/Outlet Box, Switch, Box Connectors,
Wirenuts, Switch Cover, Bonding Screw, Staples
Neon Test Light
No. 2 Phillips Screwdriver
Claw Hammer
3/16" Slotted Screwdriver
Speed Controller
Pliers
Wallboard or Compass Saw
Soft Cloth
Stud Locator
Ladder
Electrician's Pliers
Wire-Stripper
Cable-Ripper
Surface-Wiring System
Check your state and local codes before starting any project. Follow all safety precautions. Information in this on-line brochure has been furnished by the National Retail Hardware Association. Every effort has been made to ensure accuracy and safety. Neither the NRHA nor the retailer can be held responsible for damages or injuries resulting from the use of the information in this document.