|
Create New Account
Millard Lumber Newsletter
Register to receive newsletters and notices by email. Register Now
_____________________________

|
How To Patch & Repair Drywall
Here are tips and suggestions on how to patch and repair plasterboard walls. Read these
suggestions carefully to help you make such repairs easily and quickly.
|
1. REPAIRING SMALL DENTS IN WALLBOARD
- Objects that come in contact with wall board can cause dents or scratches in the
surface. These indentations are easy to repair.
- First, sand the surface thoroughly (Fig. 1). This sanding roughens the surface and
provides a good base for the joint compound you will use.
- Use coarse sandpaper and a good sandpaper block. For large areas to be repaired, use a
power sander.
- Fill the dent with a good grade of joint compound using a 3" or 4" spreader
(Fig. 2). Spread the compound evenly, pressing it firmly into the dented area.
- For extremely large dents, allow the compound to dry overnight and then apply a second
coat.
- When the material is completely dry, sand the area and prime it for a coat of paint or
other finish.
- Be sure to remove any high or low spots in the patched area with a fine sandpaper.
|
|
2. PATCHING CRACKS IN WALLBOARD
- Various types of patching materials are available for patching drywall. These include
adhesive and non-adhesive drywall tapes, fast drying patching compounds and drywall
bandages.
- Regardless of the type of patching materials you use, read the manufacturer's
instructions carefully and follow each step as suggested. Some patching compounds dry
quickly, while others require longer periods to dry.
- Be sure the cracked area to be patched is completely clean and dry. Remove all dirt from
the area and clean out all cracks.
- Apply the patching plaster with a wide and flexible putty knife (Fig. 3). Apply the
compound by working across the crack with strokes in both directions. This method is the
best way to work the patching plaster into the crack.
- Force the patching material into the crack with strong, firm strokes (Fig. 4). Examine
the crack after each stroke to ensure that enough material is applied at all points.
- The knife should bend with pressure as you draw it along the cracked area. Repeat the
passes as often as necessary to force the material well into the cracked surface.
- Use the putty knife as a scraper to remove any surplus material (Fig. 5). Move it along
the cracked area gently to scrape away the surplus material that was applied by the double
strokes show in Fig. 3.
- You may want to dip the putty knife into water and make a final pass along the repaired
area (Fig. 6). Touch up any areas that need more patching material.
- After the patched area has dried completely, sand and prime it to prepare for the finish
you desire.
|
|
3. PATCHING SMALL HOLES IN WALLBOARD
- You can repair small holes, up to 4" to 6", in drywall using drywall bandages.
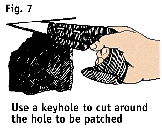
To make a drywall bandage, use a keyhole saw to make the hole into a square or a rectangle
(Fig. 7). Cut a piece of drywall the same shape as the hole. It should be 2" longer
and 2" wider than the hole.
- Lay the piece of drywall down on a flat surface, shiny side down. Measure the 1"
from all four edges and draw a line. This should form a shape the side of the hole.
- Using a straight edge and a utility knife, cut through the drywall to the bottom layer.
Do not cut the bottom layer of paper. Using a putty knife, remove the top layer of paper
and core all the way down to the bottom layer of paper (Fig. 8). Be careful not to tear
the bottom layer.
- The cut part of the patch should fit into the hole. The paper edge should cover about
1" around the hole. Apply a thin layer of patching compound around the hole. Place
the patch into the hole (Fig. 9). Using a putty knife, work the paper edge down into the
compound. Feather the edges of the compound and allow it to dry. You may need to sand
lightly and apply a second layer of compound to finish the repair.
- Larger hole, up to 12", require a slightly different repair which provides more
support. Again use a keyhole saw to form the hole into a square or a rectangle (Fig. 7).
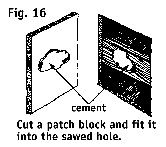
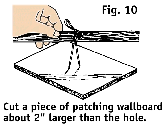
- Cut a patching piece of wallboard that's about 2" larger than the hole to be
repaired (Fig 10). Punch or drill two small holes through this piece of board and tie a
stick to it, as illustrated. Allow for about 8" between the board and the stick.
- Apply a smooth coat of good grade adhesive all around the edges of the piece of patching
material.
- Insert the patching board through the hole and position it so the adhesive fits firmly
against the solid area around the hole.
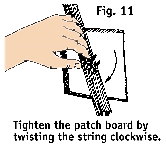
- Now turn the stick clockwise twisting the string and increasing pressure against the
patch board at the rear of the hole (Fig. 11). When the string has been thoroughly
tightened, it will hold the board firmly into place until the adhesive dries.
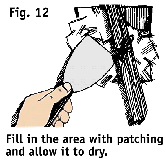
- Give the adhesive time to dry. Then fill in the area with a good grade of patching
plaster (Fig. 12). Leave the stick and the string in position during the patching process.
- You may need to apply two or three layer of patching plaster to build up the patched
area. Always allow one layer to dry before applying another.
- Remove the stick and string just before the material dries. Smooth out the area then let
the patch dry thoroughly.
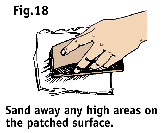
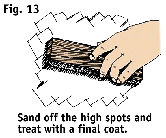
- When the area is completely dry, sand off all high spots and apply a prime coat for
paint or other finish (Fig. 13)
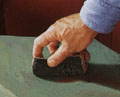
- Use a fine grade of sandpaper and a sanding block for the finish sanding work.
|
|
PATCHING LARGE HOLES IN WALLBOARD
- Larger holes in wallboard require some type of supporting brace for the patch.
- Use a short piece of 2 x 4 cut to the proper length as a supporting brace for patching a
large hole in plasterboard (Fig. 14).
- Cut two pieces of 2 x 4 to a length about 8" longer than the distance across the
hole.
- Apply a good grade of cement to one piece of 2 x 4, then insert it through the hole. Tie
it to another piece of 2 x 4 holding it parallel in front of the wallboard.
- Allow the pieces of 2 x 4 to remain tied in this position until the cement dries. Most
cements require about one hour to dry.
- Next, remove the supporting piece of 2 x 4 in front of the wallboard by untying the
string (Fig. 15). The cement will hold the back piece of 2 x 4 firmly in position,
providing a support brace for the wall patch.
- Now cut a patch block to the exact dimensions of the sawed-out area. (Fig. 16). The
block will be slightly smaller than the hole itself, but cut it to fit as tightly as
possible.
- Apply cement to the back of the patch block and the support brace, then put the patch
into position in the hole.
- Use a firm putty knife or patching spatula to apply joint compound all around the patch
board (Fig. 17).
- Work the patch compound thoroughly into all cracks. Scrape away any surplus material,
then allow the patched area to dry completely.
- When the area has completely dried, use a regular sanding block and a piece of fine
sandpaper to sand away any high areas on the patched surface (Fig. 18).
- A prime coat can now be applied to prepare the wall for painting.
|
TOOLS AND MATERIALS CHECKLIST
| Sandpaper (Coarse & Fine) |
Joint Compound |
Keyhole Saw |
Good Grade of Adhesive |
| Wallboard Tape (Regular or Adhesive Black) |
Pieces of Wallboard |
Hammer |
Sandpaper Block |
| Scraper |
Putty Knife |
Hand Saw |
Heavy Cord |
| Short Sections of 2x4 |
Small Nails |
Drywall Bandage |
Utility Knife |
Check your state and local codes before starting any project. Follow all safety
precautions. Information in this brochure has been furnished by the national Retail
Hardware Association. Every effort has been made to ensure accuracy and safety. Neither
the N.R.H.A. nor the retailer can be held responsible for damages or injuries resulting
from the use of the information in this booklet.
|