|
|
|
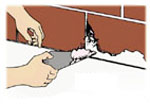
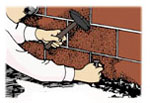
| FIG.
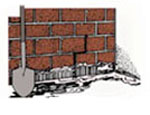
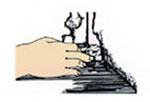
1 -
Water leaking
through cracks or seeping through basement
walls can be stopped. |
| |
|

STOPPING LEAKS AND SEEPAGE
- If you're bothered with leaks or seepage through your basement floor or walls, the problem can be solved. However, it takes time and effort, and you have to do the job right. But it can be done.
- There are three basic causes of seepage and cracks in basements. First, the original workmanship may be poor. Second, the house may have settled, causing cracks in either the floor or walls. Finally, water pressure from the outside may have built up and be forcing water through the walls.
- Such leaks are easy to detect (Fig. 1). Moisture often begins to seep through at the area where the floor and walls joins or along cracks that may appear in the wall or floor.
|
|
|
|
|
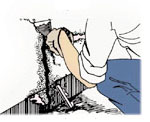
| FIG.
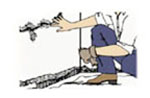
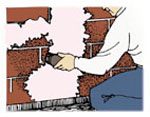
2 - Any cracks larger than 1/8" should be sealed before
the wall is waterproofed. |
|
|
|
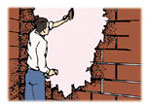
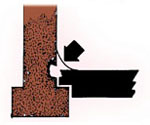
| FIG.
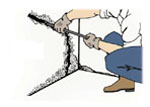
3 - If water is seeping in under pressure, you must chip out
a dovetail groove. |
|
|
|
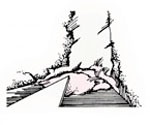
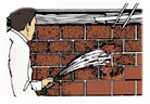
| FIG.
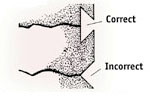
4 - Enlarge the crack by cutting away a dovetail space to hold
new repair mortar. |
|
|
|
| FIG.
5 - Holes should be chipped out and filled before waterproofing. |
| |
|

REPAIRING HOLES AND CRACKS BEFORE WATERPROOFING
- If there are no holes or cracks in the basement walls, you can apply a waterproofing compound directly to the walls by steps described later. However, almost all basement leaks are caused by either cracks or holes in the walls or floors that should be repaired before waterproofing is applied.
- You can usually fill hairline cracks with a regular waterproofing mix. However, cracks larger than 1/8" should be cleaned out and patched before you apply the waterproof mix (Fig. 2).
- You can purchase special epoxy and latex cement formulas for mortaring small repair jobs or for brushing on as a waterproof coating. However, for a large repair job, you will probably want to mix your own mortar for patching holes and cracks before you start applying the waterproofing coat.
- Mortar for filling holes and cracks in cement basement walls or concrete block walls is usually made by mixing one part cement and two parts of fine sand with just enough water to make a rather stiff mortar.
- If the water is merely seeping through the basement wall, force the mixture of mortar cement into the crack with an ordinary trowel or putty knife. This should correct any leakage problem.
- However, if outside pressure is forcing water through the wall, the problem is often extremely difficult to correct.
- If water is seeping in under pressure, you must chip out a dovetail groove for the entire length of the cracked area (Fig. 3). Use a regular chipping chisel and hammer or a cold chisel to make a dovetail groove.
- Fig. 4 shows both the correct and incorrect ways to enlarge the cracked area before mending it. Use a chipping or cold chisel to create a dovetail space (Fig. 4). This provides a holding area for the new mortar.
- An incorrect groove, as illustrated, causes the mortar to fall out of the repaired area when it dries. Take time to do it right–it will pay off in the long run.
- Repair holes in a concrete or concrete block wall in the same manner. Chip out the faulty or broken area in dovetail fashion. The dovetail cut (Fig. 4) provides a holding edge for the new mortar.
- When the faulty cement around the edge of the hole has been completely chipped away, fill the hole with the same mortar mix recommended for filling cracks (Fig. 5). This mixture is one part cement to two parts fine sand mixed with just enough water to create a stiff mortar.
- Place the mortar in the newly cleaned hole, and smooth it out with an ordinary trowel. Be sure the mortar is pressed into all parts of the hole, leaving no air pockets.
|
|
|
|
|
| FIG.
6 - If water is entering under pressure, dig out a section of
wall and insert a weep pipe for drainage. |
|
|
|
| FIG.
7 - Fill the area down to the pipe, then remove the pipe and
fill the hole. |
|
|
|
| FIG.
8 - Make a plug of putty-line mortar mix and shape it to
fill the hole. |
|
|
|
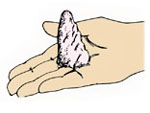
| FIG.
9 - When the plug begins to stiffen, insert it into the hole
and press into shape. |
| |
|

CLOSING CRACKS AND HOLES
- You may need to position a weep pipe through the wall to permit the outside water trapped against the wall under pressure to escape.
- In many cases, the weep pipe need only be temporary. In other cases, it is necessary to leave it in place and drain the water away through a basement sewer trap or with a sump pump (Fig. 6).
- Insert the weep pipe at the point where the wall and the floor join or at the point where the pressure is greatest.
- Use regular patching mortar to fill the crack, starting at the top and working toward the bottom. This permits a more secure bonding of the new mortar.
- Use an ordinary pointing trowel. Completely fill the crack with mortar to where the weep pipe is installed.
- Let the mortar set until it is completely dry. If the water entering through the weep pipe has slowed to a trickle, you can probably remove the pipe, fill the hole and eliminate the problem.
- However, if water is still coming through the pipe with considerable force, leave the weep pipe in place and run the water into a sewer drain with a hose.
- If you decide to remove the pipe and patch the hole, treat the cracked area right down to the spot where the wall and the floor come together (Fig. 7).
- Next, make a cement plug from the mortar mix. Roll the plug into a cone shape that is slightly larger than the hole (Fig. 8).
- Roll the plug of cement in your hands until it begins to stiffen. Then place the small end of the cone-like plug in the hole where the pipe was removed and tamp it into place (Fig. 9). It can be tamped just like a cork in a bottle.
- Hold the cement plug in place with your fingers for
three-to-five minutes, allowing it time to set. Place a heavy object
over the plug during this three to five minute period to give it plenty
of time to dry before it is exposed to the full water pressure.
- After this period, remove your hand or the object holding the plug in place. By this time, the mortar plug should be dried sufficiently to close off the hole and prevent outside water from entering.
|
|
|
|
|
| FIG.
10 - Use a stiff brush and a circular motion to rub waterproofing
mix into the wall. Fill every pore. |
|
|
|
| FIG.
11 - Brush waterproofing mix only on the areas where seepage
is a problem. |
|
|
|
| FIG.
12 - After the waterproofing mixture has dried overnight, wash
the area down with a hose and apply a second coat. |
| |
|

WATERPROOFING THE WALL AND FLOOR AFTER PATCHES AND
REPAIRS
- Fill and patch all holes and cracks according to
these instructions. Then, you are ready to apply the waterproof mix.
- First, moisten the basement wall with a fine spray
before applying the waterproofing mix. Use a garden hose with the
nozzle set to a fine spray. Although the walls should be damp when
you apply the waterproof mix, no water should be standing on the wall
surface.
- You can purchase epoxy or latex waterproof mixes
for treating basement walls and floors. Most of these mixes require
you to add only water. If you use this type of mix, be sure to follow
the manufacturer's instructions carefully.
- Many waterproof mixes will not adhere to painted
walls. You must first remove the old paint by sanding, wire brushing
or sand-blasting the surface before the waterproof mixture will adhere.
- It is also important to remember that no epoxy or
latex waterproof coatings will bond to wet surfaces. Apply these materials
to a surface that is completely dry.
- If you prefer, you can make your own wall coating
mixture of plain cement and water. The mix should form a slurry–a
mixture that is the consistency of cream.
- Use a stiff brush and a circular motion to rub the
waterproof mix into the wall. Take time to fill every pore in the
wall (Fig. 10).
- First apply the coating at the bottom of the wall.
This is where the water pressure is likely to be greatest.
- Now brush the waterproofing mix to the top, then
move back to the bottom, slowly applying additional layers of the
mixture.
- Brush the waterproofing mix only over the area where
seepage or leakage is a problem (Fig. 11). Feather the mix out at
the edges until you have completely covered the area where the leakage
or seepage has occurred.
- When the coating has dried so that it does not rub
off, spray the area completely with water. Soak it thoroughly and
let it set overnight.
- After the wall has dried overnight, wet it down thoroughly
with a garden hose and apply a second coat of the waterproofing mixture
while the wall is still wet (Fig. 12). Use the same techniques for
brushing on the second coat as you did for the first coat.
- Use two coats in all cases. One coat simply will
not correct the problem under normal conditions.
|
|
|
|
|
| FIG.
13 - If the seepage is heavy, cut a dovetail joint where the
floor and wall join. |
|
|
|
| FIG.
14 - Cut a dovetail groove all along the wall base. |
|
|

PACKING A LEAKING FLOOR JOINT
- In many cases, the leaking problem in a basement
is near the joint at the floor and wall. If the leaking is not a serious
problem, you may be able to correct it by troweling on a double layer
of waterproof coating at the floor joint.
- Use an ordinary waterproof coating mixture as previously
described. Be sure the floor is clean where the mixture is applied.
- If the seepage of water is heavy, cut a dovetail
joint where the floor and wall join (Fig. 13).
- Use a chipping chisel and a hammer or an ordinary
cold chisel.
- Chip along the entire floor joint area to create
a dovetail groove that will retain the waterproof mix (Fig. 14).
- Take time to chip this groove the complete length
of the leaking area. This is one of the most important steps in the
repair job.
- After the dovetail groove has been completely chipped
away, clean it out thoroughly and prepare to apply the waterproofing
mix. Use an ordinary brush or a tire pump to brush or blow the small
pieces of cement out of the chipped area.
- The chipped-out area is now ready for the mortar.
Use the regular mixture of one part cement to two parts fine sand
plus water. You can also use ready-mix ingredients.
- Apply small amounts of the cement mix into the chipped-out
area and smooth it out with an ordinary trowel. Do not apply more
cement than you can trowel down in two to three minutes.
- Make a slight incline in the patched area, slanting
it from the floor upward toward the wall. This provides extra strength
to the patched area and helps drain away any moisture that might accumulate
in the future.
|
|